Major project: practical skills
- Aug 30, 2023
- 6 min read
Working through practice and material led research
Wax sculpture

My working process is still very centred around sketching - planning out the scale, materials and trial and error as well as display


I wanted to work with found objects - created vinyl moulds from pieces of broken concrete found around Digbeth - relates back to process of the flaneur, found object art as well as urban aesthetics.
I wanted to transform the heavy and strong materials through casting them as wax pieces - making them translucent and fragile.
I wanted to create a time based piece that would be like a scientific experiment
After sourcing a heat lamp I experimented with various waxes, finding that paraffin wax had the lowest melting point and was best suited.
However, the scale was wrong with the small test piece so I cast a much larger slab that better matched the dimensions of the lamp.
I wanted to suspend the piece, and due to health and safety needed to create a tray to collect the molten wax.
After a series of sketches I was able to develop my skills in the metal workshop, working with the technician's to cut down sheet stell and bend the edges to form a lipped tray.
I sourced some thin chain to thread through the sculpture, using eyelet screws that were screwed into the wax. However, I did find that these were not very strong and over time they broke from the wax.
I cut down strips of steel rod and hammered the tips to flatten an area to drill into and allow the chain to wrap through.
I was also able to develop my welding skills, using magnets to prop up the posts which doubled as feet.
This proved to be a successful sculpture, following health and safety protocols whilst continuing a time based melting sculpture.
Kinetic sculptures
Remote control car
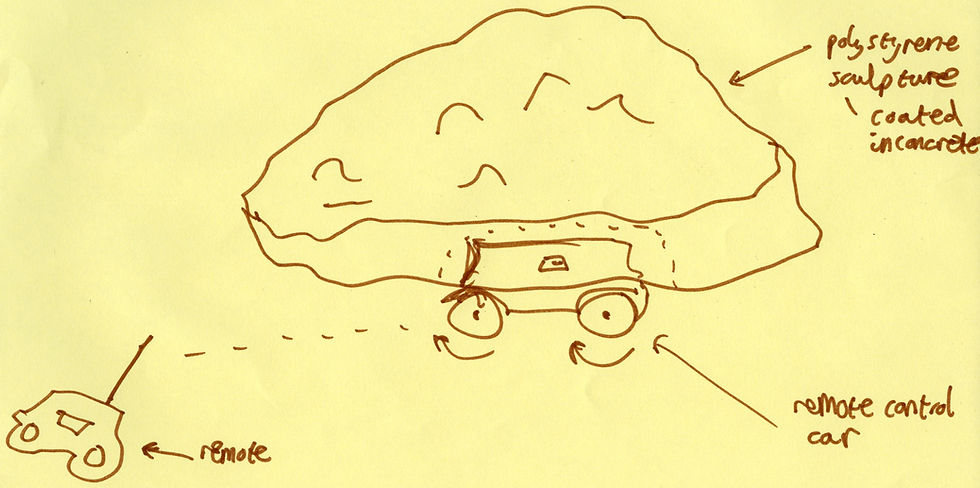
Initial sketch
Initial test
I wanted a sculpture that could be humorous and bizarre and have a full range of motion that could be controlled.
Using a remote control car allowed me to have an inbuilt circuit and motors that allowed me to gain a full range of motion.
I decided to use polystyrene as a base due to its lightweight nature and ease of modelling.
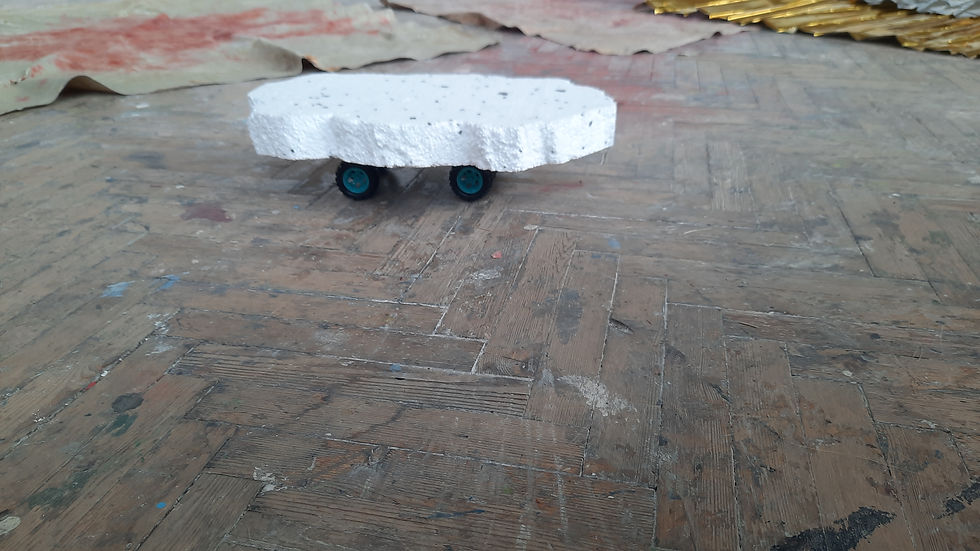
For the initial test I cut a basic shape and bored a hole using a chisel. After testing this worked quite well, however it was very wobbly and not secured to the car.
I consulted reference images of fragmented flagstones to create a fractured shape that I was happy with, however this became too small making the wheels too noticeable.


Development of project
Making use of a hot wire cutter to cut the design worked much better as it sealed the edges and did not cause crumbling
It became a difficult process of trail and error - placing the car and examining the balance
I decided to remove the plastic truck design to reduce the car down to its basic body congaing the circuit - this allowed me to have a more compact shape to inset in the foam
As I wanted to involve construction processes into my artwork I became inspired by the pebble dashing commonly used in post war buildings to cover up bad or damaged brickwork - I enjoyed this connection to 60's architecture, working class culture, British culture and the divisive view of the material - with some finding it ugly and cheap whilst others enjoying the textual quality.
Through research and video tutorials I taught myself the process of pebble dashing. Sourcing small stones and mixing a thick but wet mix of concrete.
I made sure to coat the polystyrene in PVA glue to seal and trap the air - applying another coat and leaving this wet to add the concrete to allow it to better bond.
Having a thicker mix allowed me to apply with a trowel and it also kept its consistency on the polystyrene.
Through research I found that it was best to use a general purpose cement with construction sand - as this gave me more control - creating a dry mix and then adding small quantities of water so it was not too watery, also reducing the amount of dust created.
While this was still wet I flung the stones onto the surface, gently patting them into the cement.
After the piece set I was able to brush off the excess stones from the surface.
Unfortunately, while I kept a thing coating of concrete, it was still very heavy for the car, due to the spring suspension dropping making the wheels get caught.
To fix this I cut small strips of acrylic which I jammed into the piston - preventing the spring from closing. This meant the car was locked into an upright position - making the wheels clear of the base.
Although this allowed the car to run - it still put a lot of strain - reducing the battery power and the manoeuvrability
If I was to make this again I could consider creating a faux pebble dash using fibreglass that could be painted to look real - further connecting to my interest in trompe l'oeil - where things are not as they first seem.
Jesmonite

Mixing marbling with plaster

Marble plaster test
Unfortunately, plaster did not seem the correct material to create marbling as it set too quickly and did not hold the colour. With it being too fluid it caused the colours to mix too freely - removing any of the veining associated with marble. Instead I decided to create a terrazzo as this was more controllable.


To create the terrazzo pieces I mixed up the various colours - trying to colour match them to pastel/natural marble similar to the flooring at the school of art
These colours were mixed following a 2.5:1 ratio of powder to liquid, and cast onto aprons. This allowed a non stick surface that after setting I was able to peel off and crack the sheets into small fragments.
Using silicone coaster moulds I create a series of tests. For the 1st I mixed grey colour for mortar and mixed the terrazzo pieces into the mix. After this has set I lightly sanded this to reveal the pattern. Adding the shards into the mix allowed them to be more randomly placed. However the grey colour was too dark and looked too plastic.
For the second tests I added small amount of yellow and red pigments, weighing out exact quantities. I also added sand which gave the piece texture but made it harder to sand down. For this I placed the terrazzo fragments into the mould in a contrived pattern. This did allow for more pieces to be on the surface, but it created air bubbles and some floated which resulted in an uneven surface.
For the final piece I was ambitious in scale - cutting a melamine mould coating it in a mould release agent.
For such large quantities I pigmented the liquid directly and cast the piece in 2 loads. However, this caused the cast to delaminate in parts. If I was to cast another piece I would have instead done this all in one cast.
Unfortunately, although following the correct ratio, adding the sand caused the mix to not be as free-flowing, meaning that not as many terrazzo shards dropped to the base. Instead, I could have made a thinner mix or alternatively, cast thicker and heavier pieces of terrazzo.
Once this was set I used a power sander with 40 grit to sand the surface. However, due to adding large quantities of sand it made the cast very hard and difficult to sand.
Thankfully, using a low grit sandpaper and the power sanding in circular motions eventually revealed the pattern. I then worked up the grit to 600 to buff out any scratches.
To create the affect that this slab stone had been aged, damaged or dug out of the ground I used a chisel to break the edges into a more natural, random shape. To avoid breaking the piece too much I placed a wooden block over and clamped this down, this allowed the break line to be more controlled, however, it still delaminated some areas.
To finish the piece I added a beeswax polish which allowed the piece to retain a darker colouration as if still wet and allowed it to be polished to a shine - reflecting the marble aesthetic.
I was very impressed at how versatile the Jesmonite was and how it can take on the look of different materials much easier than plaster.
References:


Comments